Tag Archives: Purchase Order

It’s Your Preference – 3 of 3 – PO Report


As with the Work Order Report covered in last week’s blog, the Purchase Order Report can be tailored to meet the needs of your organization using available Preferences. To modify the Purchase Order Report, select Tools->Preferences from the Menu Bar, ensure the Purchase Order Folder is selected, and then scroll down to the section on the Purchase Order Report.

The “Show” preferences highlighted above control the content that will be displayed in the top section of the report. These preferences often vary dependent on your organization’s use of the Purchase Order Report. If the report is intended for a vendor, contact information and shipping/receiving information are likely to be desired, as shown below.

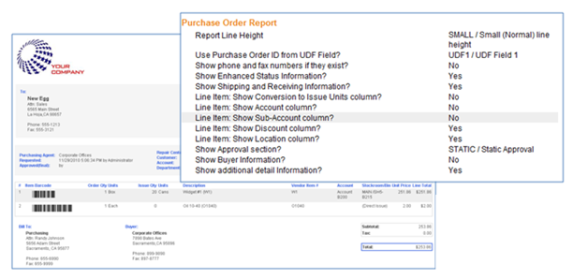
In contrast, if the report is to be sent to staff members, you might desire more information about internal processing and departments. As shown below, the “Show Enhanced Status” preference was turned “on” to show additional information about the individuals requesting, issuing and approving the purchase order. The “Show Additional Detail” preference was also enabled to display organizational information such as repair center, department and account:

The section of preferences for “Line Items”, allows you to control the columns that will be displayed. In the first example, the display is more vendor oriented, showing “conversion to issue units” in the “Order Qty” column, as well as displaying any applied discounts:

In contrast, preferences can be set to provide more information for internal staff, such as “location” (stock room and bin), and account:

The additional settings allow you to replace the Purchase Order ID with a UDF that stores an internal ID, and determine the type of approval information that should be displayed at the bottom of the report. To clarify the options for the Approval Section, “default” lists approvals that been made, “static” provides blank lines to allow for approval, and “enhanced” shows approvals if they exist, providing a blank line if none exist. The “line height” preference determines the amount of space provided when approval lines are displayed.

It should also be noted that the Purchase Order Barcoding Preferences, found directly below the Purchase Order Report Preferences, allow you to determine whether or not barcodes should display on the report:

Version 5.0 Release – Purchase Order Module Enhancements


Version 5.0 includes several enhancements to the Purchase Order Module, including a new approval process and additional configuration options for the Purchase Order Report.

Purchase Order Approvals

A new approval process is available that allows you to define required approval levels based on the total amount of the purchase order. You can define up to five different approval levels for each Repair Center. As an example, you could specify that all purchase orders above $100 require Level 1 Approval, all purchase orders over $500 require Level 2 Approval, and all purchase orders over $1000 require Level 3 Approval.


With these settings, a purchase order for $1500 would need three levels of approval.  To provide maximum flexibility, approvals can be made in any order. That is, if desired, a Level 2 Approver can process an approval before a Level 1 Approval has been completed. A new “Approval Status” section provides a clear indication of which levels have been approved, and which still need approval.


The previous approval process, which bases approval requirements on the “permissions” of the individual creating the purchase order, rather than the amount of the purchase order, continues to be available.

Purchase Order Report Configuration

Extensive new preferences are now available to configure the Purchase Order Report to better reflect the needs of your organization. Some preferences allow you to include additional fields for display, while others allow you to hide data that was previously shown by default.

 For example, new line item columns including “Account,” Sub-Account,” and “Stockroom/Bin” may be displayed, while the existing “Discount” column may now be hidden.  

Next Week….

Stay tuned next week for a preview of additional features included in Version 5.0, such as, the ability to process manually generated PMs and Projections in the background, and a new password protection feature to avoid accidental record deletions!

Setting Up Conditional Formatting


Conditional Formatting is a way to set the style of records in the explorer sections of the Maintenance Connection software. This will allow you to quickly identify records that you may need to take action on. Currently, Conditional Formatting can only be used in the Work Order, Asset, Purchase Order, and Inventory modules. In order to set up Conditional Formatting you will need to be logged into the MRO and have the appropriate access group rights.

In this example, we will be highlighting certain work orders by setting the text to red when they are set at a High priority. Start by selecting the Preferences option from the Tools dropdown menu. Once the Preferences  dialog window is open, ensure that the Work Order module has been selected in the list on the left.

image

The Conditional Formatting can be set to occur for only your specific user image or for all members of a specific repair center. image

For each module that is setup to use conditional formatting, you can set up to three Format Criteria.

image

We need to tell the system how to find the Work Orders that are High priority. In order to do this we will need to add in some SQL by clicking the Format Criteria 1 option, a new window with an input will appear with which we will add the following SQL:

Select 1 From WO WITH (NOLOCK) WHERE WOPK = [RECORDPK] AND PRIORITYDESC = 'HIGH'

Now that we have told the system how to identify the High priority work orders, we can tell it how to display them. Clicking on Format Style 1 will bring up another window with which we will add the following code for the red color:

COLOR:#FF0000

After saving our preferences and closing the preference dialog we can refresh the Work Order Explore window to see our changes.

image

As you can see, this feature can be extremely useful in identifying and highlighting records in the Maintenance Connection system that need attention. For more information on how to setup Conditional Formatting as well as additional examples of SQL that can be used, please download the .


NFMT 2009 Trade Show

Join us at the National Facilities Management and Technology Show next Tuesday, Wednesday and Thursday (March 10-12) in Baltimore. Find us at booth #1859. If you’re able to stop by, let us know.